


Some days you catch yourself in a photo and the first thing you notice is your teeth. A chipped front tooth. A gap that’s always bugged you. A bit of staining that no whitening strip ever seems to touch. You’ve probably thought about veneers more than once and then closed the tab, because the whole thing sounds expensive, permanent and a bit scary.
That’s fair. It’s a big decision, and most of us don’t know what actually happens in the chair.
So let’s walk through it, start to finish. This isn’t about selling you on a “perfect smile.” It’s about knowing what you’re getting into, so you can make a calm decision.
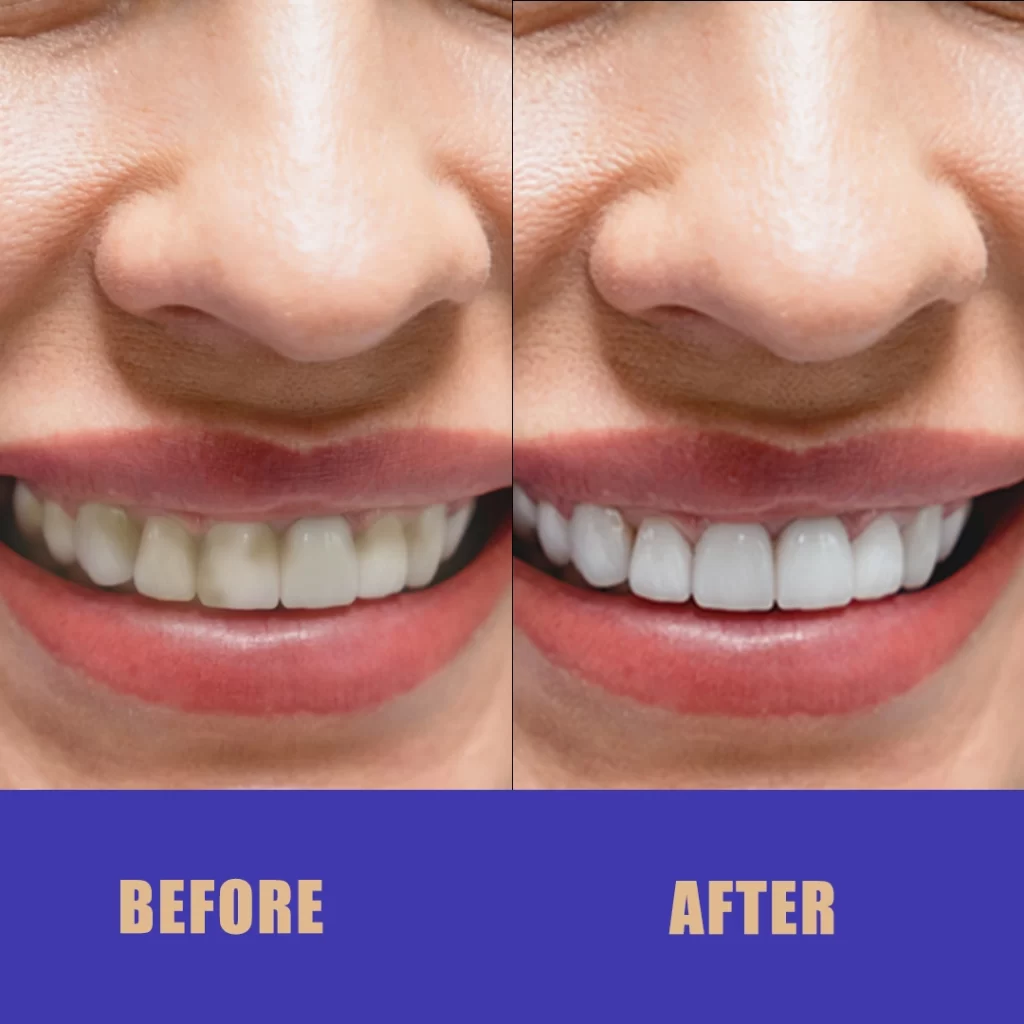
So What Is a Veneer, Really?
A veneer is a thin shell that sits over the front of a tooth. Think of it like a new face for the tooth. It covers chips, stains, small gaps and teeth that are a bit crooked or worn down.
There are two main types, and the process is quite different for each.
Porcelain veneers
These are made in a dental lab from a thin, strong ceramic. They’re custom-made for each tooth, then glued on. They look very natural, they don’t stain easily, and they can last a long time with good care. Often 10 to 15 years, sometimes longer.
The catch is they usually take two or more visits, they cost more, and the dentist almost always has to shave a little enamel off your teeth first. That part can’t be undone.
Composite veneers
These are made from tooth-coloured resin, the same sort of material used in white fillings. The dentist builds them up on your teeth by hand, layer by layer, and shapes them right there in the chair.
They’re cheaper, usually done in one visit, and often need little or no shaving of the tooth. But they can chip and stain more easily, and they generally don’t last as long. Maybe five to seven years before they need touching up or redoing.
Neither one’s “better.” It just depends on your teeth, your budget and what you want out of it.
Step 1: The First Consultation
This is just a chat and a look. No drilling.
Your dentist will ask what’s bothering you about your smile and what you’re hoping for. Be honest here, even if it feels a bit vain saying it out loud. They hear it all day.
They’ll check your teeth and gums properly, and they’ll usually take X-rays and photos. This bit matters more than people think. If you’ve got decay, gum disease or a few teeth that need fixing, that has to be sorted first. Veneers on unhealthy teeth just don’t last.
They’ll also look at your bite and ask if you grind or clench your teeth. Grinding is hard on veneers, especially porcelain, so it’s worth knowing early.
Questions worth asking at this stage
Write these down before you go in. It’s easy to forget when you’re sitting in the chair with a bib on.
- Am I actually a good fit for veneers, or is there a simpler option?
- Would you go with porcelain or composite for me, and why?
- How much of my tooth will you need to remove?
- How many teeth do you think I’d need done?
- What’s the total cost, including follow-up visits?
- How long will they last, and what does replacing them cost?
- Can I see photos of veneers you’ve done before?
Sometimes the honest answer is that whitening, bonding a single tooth or a bit of orthodontic work would do the job. A good dentist will tell you that.
Step 2: Planning Your New Smile
Once you’ve decided to go ahead, there’s usually a planning stage. This is more common with porcelain.
Your dentist might take moulds or a digital scan of your teeth and create a model of how the veneers will look. Some clinics do a “mock-up,” where they put temporary material over your teeth so you can see the new shape in the mirror before anything permanent happens.
This is your chance to speak up. Too long? Too white? Too square? Say so now. It’s a lot easier to change a plan than a finished veneer.
You’ll also pick a shade. Most people are tempted to go as white as possible. Just keep in mind that very bright teeth can look a bit fake next to your natural ones, especially if you’re only getting a few done.
Step 3: Preparing the Teeth
This is the bit most people are nervous about, so let’s be straight about it.
For Porcelain veneers, the dentist removes a thin layer of enamel from the front of each tooth. We’re usually talking around half a millimetre. That’s thinner than a fingernail. It’s done so the veneer can sit flush and doesn’t look bulky.
You’ll normally get a local anaesthetic first, so it shouldn’t hurt. You’ll feel some pressure and vibration, and you’ll hear the drill, which is honestly the worst part for a lot of people. If you get anxious at the dentist, tell them. Many clinics can offer things like happy gas or just let you take breaks.
One more time, because it’s important: once enamel is removed, it doesn’t grow back. That tooth will always need some kind of covering from then on.
For composite veneers, there’s often little or no preparation. Sometimes the dentist roughens the surface slightly so the resin sticks better. Sometimes they don’t need to touch the tooth at all.
Step 4: Impressions or Scans
After the teeth are prepared, the dentist takes a copy of them so the lab can make your porcelain veneers.
This might be the old-school way, with a tray of soft putty you bite into for a few minutes. It’s not painful, just a bit gaggy and boring. Or it might be a digital scan with a small wand that moves around your mouth. Lots of clinics use scanners now, and most people find them much easier.
The lab then makes your veneers. That usually takes around one to three weeks, depending on the lab and the clinic.
If you’re getting composite veneers, you skip this step. The dentist builds them straight onto your teeth in the same appointment, shaping and polishing as they go. It can take a few hours for a full set, so bring something to listen to and don’t book anything big that arvo.
Step 5: Living With Temporary Veneers
While you wait for porcelain veneers to come back from the lab, your dentist will usually fit temporary ones. They protect the prepared teeth and stop you walking around with shaved-down teeth for a fortnight.
Temporaries are just that. Temporary. They might feel a bit rough, look a bit bulky and not quite match. That’s normal.
A few simple tips while you’ve got them:
- Go easy on hard and sticky food, like crusty bread, nuts and lollies
- Don’t bite into things with your front teeth if you can help it
- Brush gently and floss carefully, sliding the floss out sideways
- Expect some sensitivity to hot and cold drinks
If one comes off, don’t panic. Just call the clinic and they’ll pop it back on.
Step 6: Fitting Day
This is the appointment where it all comes together.
First, the dentist removes the temporaries and cleans your teeth. Then they place each veneer on without glue so you can both check the fit, shape and colour. You’ll usually get a mirror. Have a proper look. If something feels off, now’s the time to say it.
Once you’re happy, they prepare the surface of your teeth so the veneers bond well, apply a special cement, and press each veneer into place. A blue curing light hardens the cement in seconds. Then they clean off any extra cement and check your bite.
It’s mostly just lying there with your mouth open for a while. Not painful, just a bit tiring for your jaw.
Step 7: Adjustments and the Follow-Up
Your new teeth will probably feel strange at first. Bigger, smoother, just different. Your tongue will keep poking at them. That usually settles within a week or two.
Most dentists book a follow-up visit a couple of weeks later to check your gums, look at the edges and make sure your bite feels right. If something catches when you chew or one spot feels high, they can usually smooth it down in a few minutes.
Don’t sit on it if something doesn’t feel right. Small bite problems can turn into chips or a sore jaw if you leave them.
Step 8: Looking After Your Veneers
Good news here. Looking after veneers is pretty simple. It’s mostly just looking after your teeth.
- Brush twice a day with a soft brush and a non-abrasive toothpaste
- Floss every day, because the tooth underneath can still get decay
- Keep up your check-ups and cleans
- Don’t use your teeth as tools. No opening packets or biting fingernails
- Wear a night guard if you grind your teeth
- Wear a mouthguard for contact sport
Porcelain doesn’t stain much, but composite can pick up colour from coffee, tea, red wine and smoking. A quick rinse with water after your morning coffee helps.
The Uncomfortable Bits, Honestly
Veneers aren’t usually painful, but they’re not nothing either. Here’s what people commonly notice:
- Sensitivity. Teeth can feel sensitive to hot and cold for a few days or weeks after preparation.
- Sore gums. Your gums might be a bit tender around the edges for a few days.
- A sore jaw from keeping your mouth open for a long appointment.
- Talking feels weird. Some people get a slight lisp for the first few days while their tongue adjusts.
Most of this fades on its own. If pain lingers or gets worse, call your dentist.
How Long the Whole Thing Takes
Roughly speaking:
- Composite veneers: often one visit, plus a check-up. Sometimes done in a single day.
- Porcelain veneers: usually two to three visits over about two to four weeks, not counting any work needed beforehand.
If you need fillings, gum treatment or other work first, add that time on.
What About Cost?
We won’t pretend there’s one price, because it varies a lot between clinics and cities. As a rough guide in Australia, composite veneers are often a few hundred dollars to around a thousand per tooth. Porcelain veneers are commonly somewhere in the range of $1,500 to $3,000 per tooth, sometimes more.
Veneers are usually seen as cosmetic, so Medicare doesn’t cover them. Some private health extras policies might pay a small part under major dental. Just ring your fund and ask, with the item numbers your dentist gives you.
And remember to factor in the long run. Veneers eventually need replacing, so it’s not a one-off cost.
A Few Made-Up People, Just to Picture It
These people aren’t real. They’re just examples to help you see how it can play out.
Kate, 34, Newcastle. Kate chipped her front tooth on a stubby years ago and has hated it in photos ever since. Her other teeth are fine. Her dentist suggests one composite veneer, done in a single morning with no drilling. She’s in and out before lunch and back at work by two.
Tom, 52, Adelaide. Tom’s front teeth are worn down and stained from decades of coffee and a grinding habit. He goes with six porcelain veneers. He wears temporaries for a fortnight, finds them a bit annoying, and gets a night guard once the real ones go on. The sensitivity bugs him for about a week, then disappears.
Sophie, 27, Hobart. Sophie came in wanting a full set of eight porcelain veneers she’d seen on social media. After the consult and a mock-up, she realised she mostly just wanted her teeth whiter and one small gap closed. She ends up with whitening and two composite veneers. It costs a fraction of what she’d budgeted.
The Takeaway
Veneers can make a real difference to how you feel when you smile. But they’re a commitment, especially porcelain, because removing enamel is permanent.
The process itself is pretty manageable. A consult, some planning, a bit of preparation, a fitting and a check-up. Composite is quicker and cheaper but needs more upkeep. Porcelain takes longer and costs more but tends to last.
If you’re curious, just book a consultation and ask all the questions. You don’t have to decide anything on the day. Take the information home, sleep on it, maybe get a second opinion. The right choice is the one that suits your teeth, your budget and your life, not the one you saw on someone else’s feed.










Leave a Reply